Create API User on FortiGate
How to obtain an API key on a FortiGate
Prerequisite: Security Profile Selection
Before creating the API user, determine the access required:
-
Option A (Recommended): Use the default
super_admin_readonlyprofile. This ensures ThreatSabre can fetch all necessary data without the risk of accidental configuration changes. -
Option B (Alternative): Create a specific Access Profile with "Read" permissions for the subsystems ThreatSabre monitors.
Method 1: Graphical User Interface (GUI)
Step 1: Select or Create Admin Profile
Option A (Recommended) For most deployments, using the built-in system profile is the most efficient method.
-
Profile Name:
super_admin_readonly -
Advantages: Pre-configured by Fortinet to allow full read access to all system settings, firewall policies, and logs without write capabilities. It ensures ThreatSabre can fetch all necessary telemetry without further manual tuning.
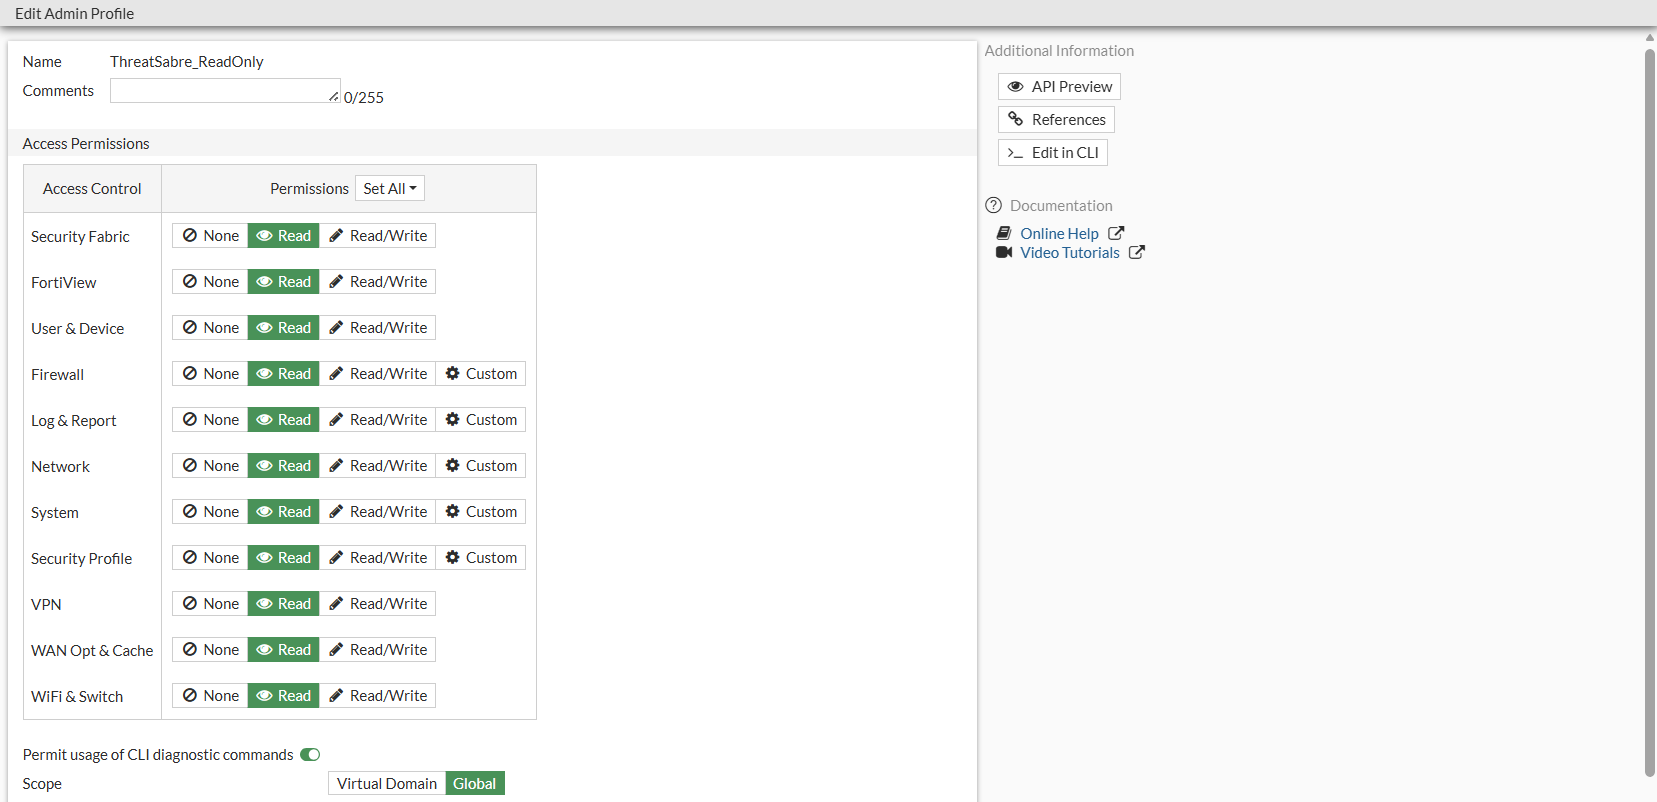
Option B If your organization’s security policy requires more granular restrictions, you can create a bespoke profile that limits access only to the specific modules required for posture assessment.
- Navigate to System > Admin Profiles.
Navigate to the Global context if the FortiGate is in Multi-VDOM mode.
-
Click Create New.
-
Name:
ThreatSabre_ReadOnly. -
Set all permissions to Read (None for Write/Execute).
-
Set the scope to Global.
-
Click OK.
Step 2: Create the REST API Admin
-
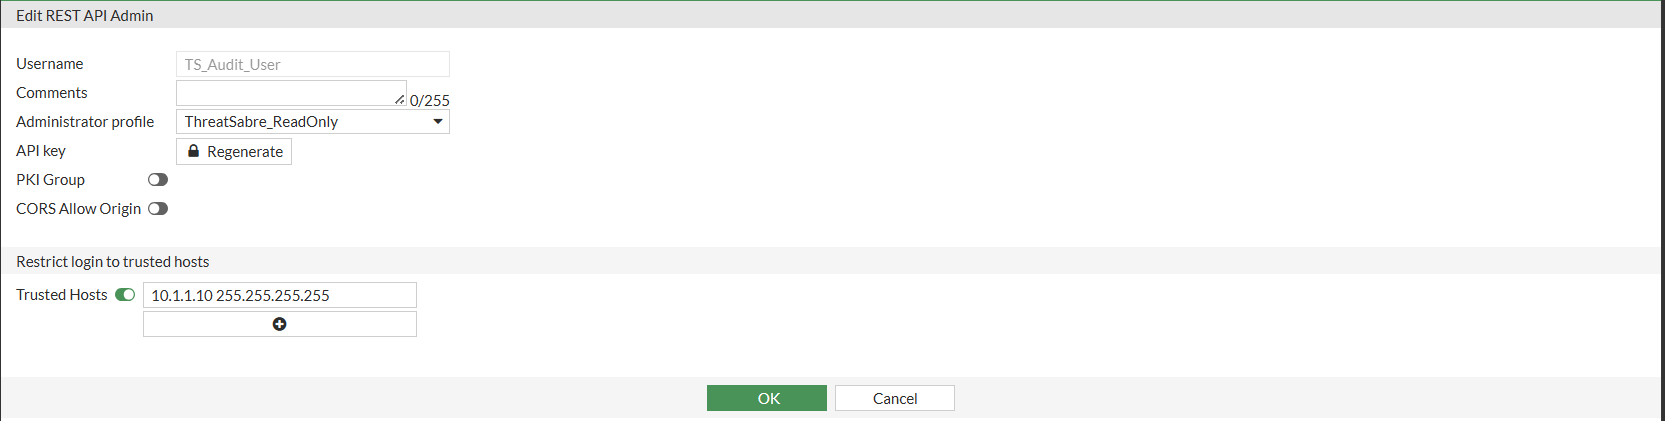
Navigate to System > Administrators.
-
Click Create New > REST API Admin.
-
Username:
TS_Audit_User. -
Administrator Profile: Select
super_admin_readonlyor your custom read-only profileThreatSabre_ReadOnly. -
PKI Group: (Leave Disabled).
-
Trusted Hosts: Enter the internal IP address of the Linux machine running your ThreatSabre Agent. This prevents the API key from being used from unauthorized locations.
If you're running FortiOS before 7.4.1, please be aware of this issue where adding a trusted host to an API user does not make the admin interface available to that IP. You need to add the IP to the trusted hosts of a regular admin user.
- Click OK.
Step 3: Retrieve the API Token
-
A window will pop up showing the API Key.
-
Copy this key immediately.
FortiOS will never show this key again. If you lose it, you must regenerate it.
Method 2: Command Line Interface (CLI)
Copy and paste these commands into your FortiGate CLI to achieve the same result. Replace <Agent_IP> with the IP of your ThreatSabre Agent host.
1. Create the Custom Read-Only Profile (If Required)
# Enter the access profile configuration sub-menu
config system accprofile
    # Create or edit the profile named "ThreatSabre_ReadOnly"
    edit "ThreatSabre_ReadOnly"
        # Grant read access to Security Fabric information
        set secfabread read
        # Enable read-only viewing for FortiView dashboards
        set ftview read
        # Allow reading of User & Device authentication groups
        set authgrp read
        # Allow reading of System settings (DNS, NTP, etc.)
        set sysgrp read
        # Allow reading of Network settings (Interfaces, Routing)
        set netgrp read
        # Allow reading of Log & Report configurations
        set loggrp read
        # Allow reading of Firewall Policies and Objects
        set fwgrp read
        # Allow reading of VPN configurations (IPsec/SSL)
        set vpngrp read
        # Allow reading of Security Profiles (AV, IPS, Web Filter)
        set utmgrp read
        # Allow reading of SD-WAN and WAN Optimization settings
        set wanoptgrp read
        # Allow reading of Endpoint Control and ZTNA tags
        set endpoint-controlgrp read
    # Save the entry and return to the previous menu
    next
# Apply changes and exit global configuration
end
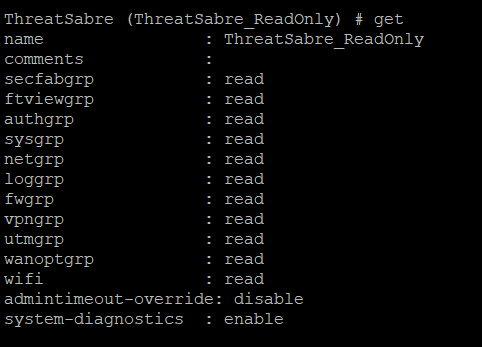
Running the get command within the access profile context is the best way to verify that every attribute has been registered by the FortiGate.
2. Create the API User & Set Trusted Host
# Enter the API User configuration sub-menu
config system api-user
    # Create or edit the specific user "TS_Audit_User"
    edit "TS_Audit_User"
        # Choose super_admin_readonly or ThreatSabre_ReadOnly; only one set accprofile applies
        set accprofile "super_admin_readonly"
        # set accprofile "ThreatSabre_ReadOnly"
        # Enter the Trusted Host sub-menu to define source IP restrictions
        config trusthost
            # Create the first (and primary) trust entry
            edit 1
                # ONLY allow API requests from the ThreatSabre Agent's specific IP address
                set ipv4-trusthost <Agent_IP> 255.255.255.255
            # Save the trusthost entry
            next
        # Exit trusthost configuration
        end
    # Save the API User entry
    next
# Apply changes and return to global system prompt
end
If you're running FortiOS before 7.4.1, please be aware of this issue where adding a trusted host to an API user does not make the admin interface available to that IP. You need to add the IP to the trusted hosts of a regular admin user.
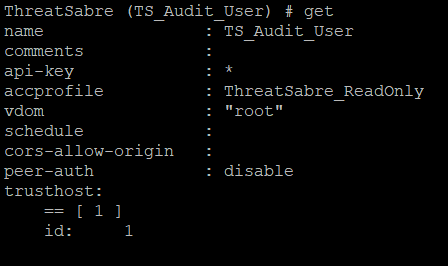
Running the get command within the user context is the best way to verify that every attribute has been registered by the FortiGate.
3. Generate the API Token
Run this command to generate and view your token:
execute api-user generate-key TS_Audit_UserOutput example: New API key: a1b2c3d4e5f6g7h8i9j0k1l2m3n4o5p6q7r8s9t0u1v2w3x4y5z6